
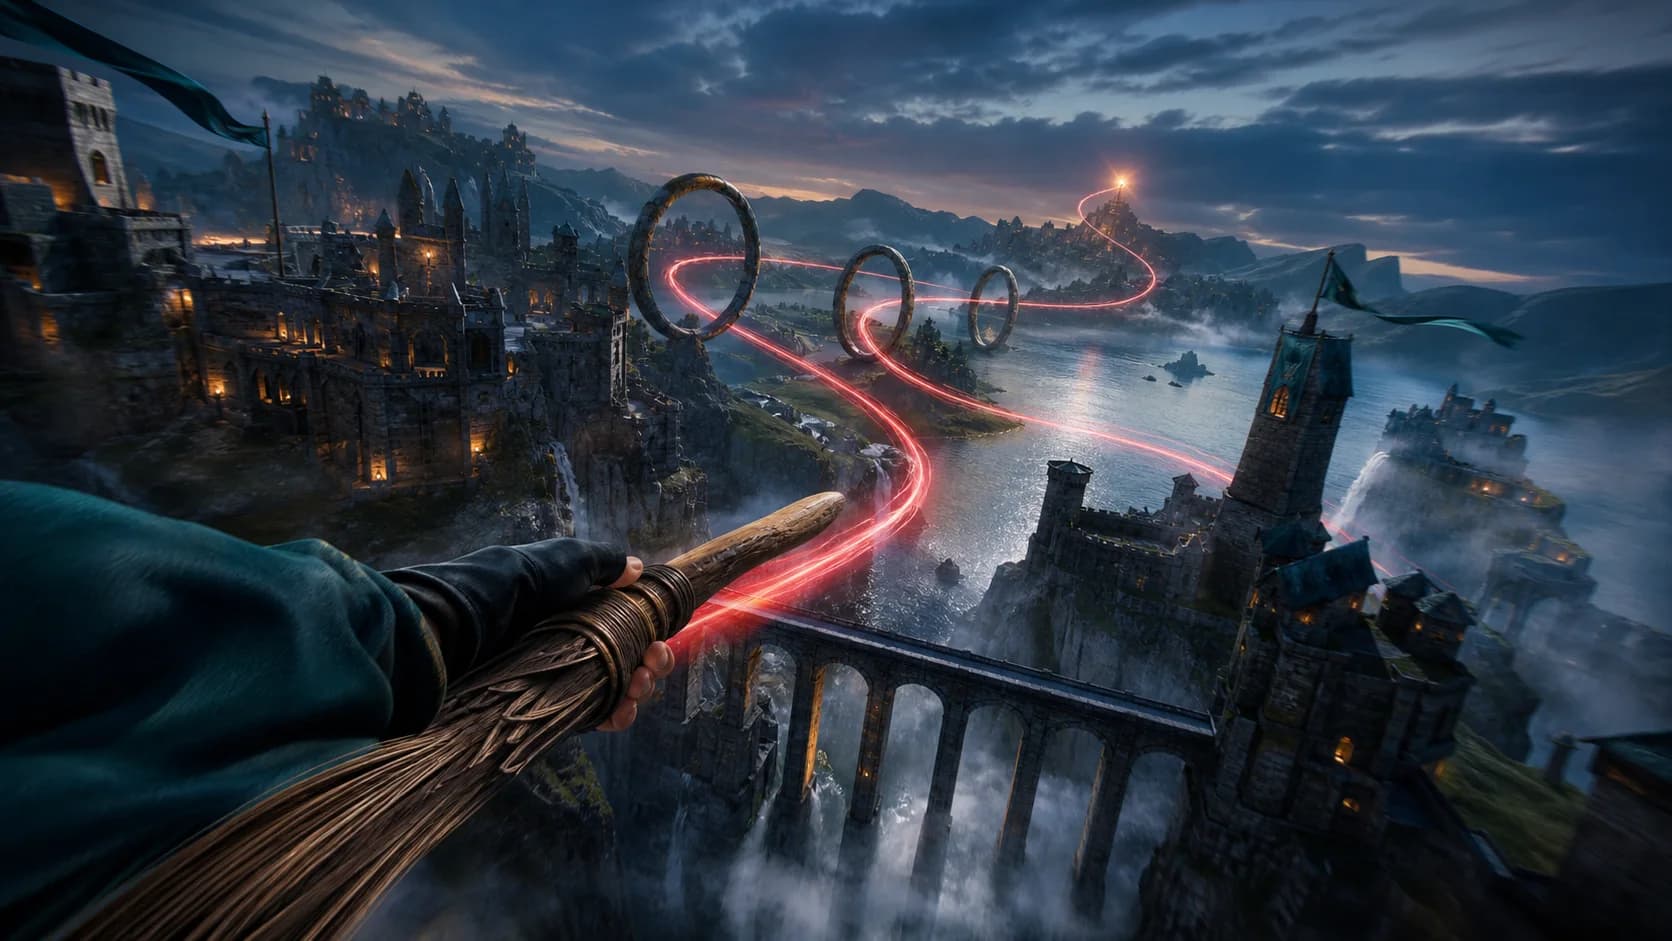
Seedance 2.0 Path Control is basically AI Quidditch FPV now with a prompt
Learn the community Seedance 2.0 path-control workflow using a marked reference image, waypoint prompt, FPV demo, and practical fixes for route drift.
Seedance 2.0 path control sounds like a camera spline. This community workflow instead combines a marked still with a prompt that describes the same journey through ordered landmarks.
Think of the line as a visual storyboard, not GPS. It communicates turns and destination; the prompt explains what those marks mean in three-dimensional space. The combination can guide an FPV shot, but it does not guarantee frame-perfect tracking.
TL;DR
- Treat the colored route as a broad movement guide, not an exact Bézier path.
- Start with a still image whose major landmarks and travel direction are easy to read.
- Keep the line simple, then repeat its waypoints in the prompt in the order the camera should visit them.
- Define a continuity anchor, such as a vehicle nose or dashboard, including its position and orientation.
- Review several takes for direction, route order, guide-mark removal, and the ending action.
What the Seedance 2.0 Path-Control Demo Actually Shows
The community example is a 15-second stacked comparison. Below is a castle still with two red route strokes; above is a continuous first-person flight from a sports field, past the castle and viaduct, then toward a glowing object near a tower.
The landmark order is recognizable, but the output does not trace the marks like a camera in 3D software. The source prompt also names every major location and action, so the demo shows the marked image and waypoint prompt working together—not the line acting alone.
ByteDance says Seedance 2.0 can use multimodal references for composition, motion, camera language, and visual rhythm.[1] Its official materials do not document a dedicated red-line spline tool.[2] Here, “path control” means the community-devised reference-image technique.
Before You Start: Plan One Readable Camera Journey
Choose a route you can explain in one sentence: “Launch from the courtyard, pass the left tower, dive through the central arch, skim the river, and rise beside the lighthouse.” If that requires several sentences, the journey is probably too complex for one generation.
You need three ingredients:
- A clean reference image with a clear foreground, middle distance, and destination.
- A marked copy of that image showing the intended route.
- A prompt that converts the two-dimensional line into ordered camera actions.
With multiple image references, keep the clean still and marked guide separate and assign each a role. With one image, use the marked version and say the line and arrows must not appear in the finished footage.
Use reference-to-video when you want to provide clean and marked references together. For a workflow built from one still, start with image-to-video.
Step 1: Build a Reference Image the Camera Can Understand
A route-friendly image uses a wide view, recognizable landmarks, and strong depth cues such as roads, bridges, walls, or rivers. Avoid a close-up whose destination lies outside the frame.
Check anything that remains close to the lens. The broom bristles appear to face forward in the demo. A prompt may not repair an ambiguous starting silhouette, so fix the source image and add a positive cue: “the handle points forward and the bristles trail behind the rider.”
Remove accidental text, icons, and UI fragments before adding the route; they may be reproduced in the result.
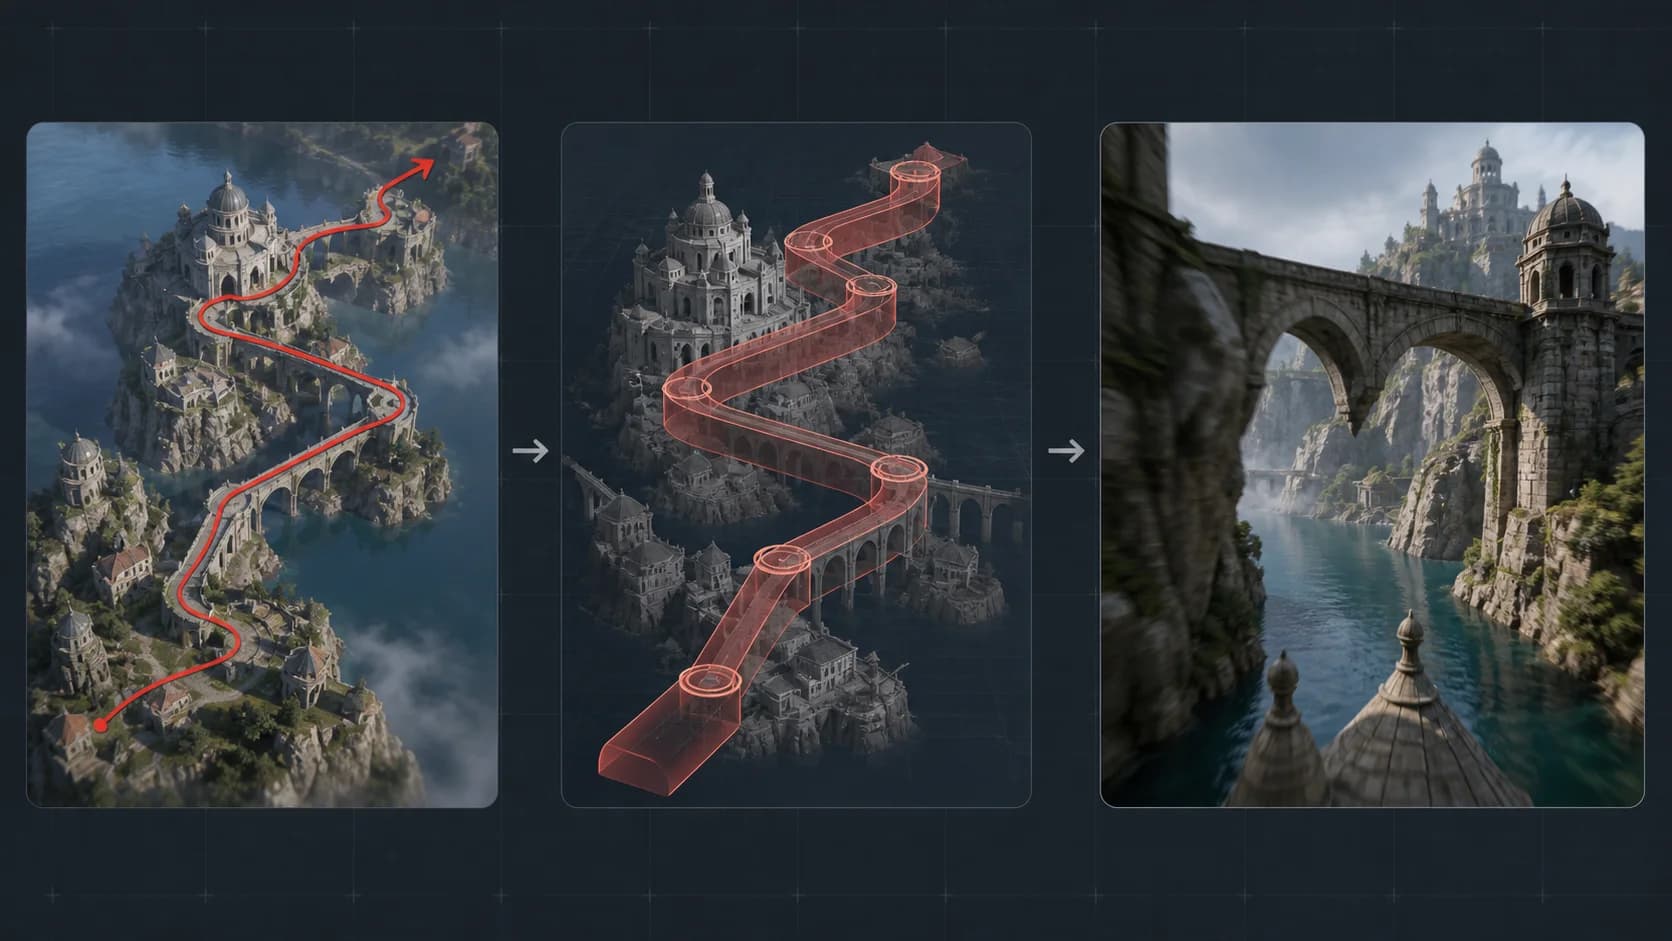
Step 2: Draw a Simple Route Around Visible Landmarks
Draw a route a director could explain. Use one high-contrast color, a clear start, and an arrow at the destination. Red is convenient, not a documented requirement.
Limit the route to a few meaningful bends, each tied to something visible: pass the tower, follow the bridge, drop under the arch. Avoid scribbles and repeated loops. A flat curve cannot fully encode altitude, roll, speed, occlusion, or which side of an object to pass.
Write major depth changes in the prompt. “Dive below the bridge” is clearer than expecting a line over the bridge to communicate descent.
Step 3: Convert the Drawing into Ordered Waypoints
Use sequential verbs—launch, climb, pass, bank, descend, skim—and attach a landmark to each. Specify left or right, then above, below, behind, or through where needed.
Every beat competes for screen time. If the final action matters, simplify the middle so the camera can arrive and complete it.
Keep route and style separate: establish viewpoint and continuity, list the movement, then add lighting and exclusions. That makes a missed beat easier to diagnose.
Step 4: Use This Original Seedance FPV Path Prompt Template
The following template preserves the useful structure of the community technique without copying its long example prompt:
CAMERA
First-person [vehicle or camera rig], one continuous unbroken take.
Move at [speed and motion character]. Keep [continuity anchor] visible in
[frame position] throughout the shot.

REFERENCE USE
Use @Image 1 for the scene, lighting, and subject appearance.
Use @Image 2 only as a route map. The colored line and arrow indicate broad
camera direction; do not render any guide marks in the final video.

ROUTE — FOLLOW IN THIS ORDER
1. Begin at [starting location and orientation].
2. Move [over/under/through] [landmark A] on the [left/right].
3. [Bank/climb/descend] toward [landmark B].
4. Pass [landmark C] while maintaining the same direction of travel.
5. Finish at [destination] and perform [clear final action].

CONTINUITY
Keep [vehicle/prop] facing forward. [Orientation detail] must trail behind.
Preserve the same environment, subject count, scale, and time of day.

FINISH
[Lighting, atmosphere, and motion feel]. No cuts, no text, no logos,
no watermarks, and no visible lines or arrows.
If you can upload only the marked image, replace the two-reference block with: “Use the colored marks only to understand the route. Reconstruct the clean scene underneath them and omit every line and arrow from the output.” This is still an instruction, not a guarantee, so check the final frames closely.
Step 5: Generate, Review, and Refine One Variable at a Time
Watch each take three times: for route order, continuity, then artifacts. Speed can hide reversed vehicles, shifting architecture, and a missing ending.
Use this review checklist:
- Does the camera start in the intended place and direction?
- Are the major landmarks visited in the correct order?
- Does the foreground anchor keep the same identity and orientation?
- Are scale, architecture, and subject count stable?
- Are all route marks absent from the generated portion?
- Is the ending readable, with no accidental cuts?
Change one major variable per attempt. Shorten the route before rewriting the style, and correct the reference image before adding more negative prompts.
For a longer chase, generate short segments and join them in an editor. End on a stable landmark or clear travel direction, then begin the next clip from a compatible composition.
Limitations and Troubleshooting
The demo's imperfections are instructive: the broom orientation is questionable, the foreground hand is not continuously visible as requested, and the camera does not reproduce the line exactly. Each is a reason to review and iterate.
| Problem | Likely cause | Practical fix |
|---|---|---|
| Camera drifts away from the line | The route contains too many bends or lacks landmark meaning | Reduce the route to three or four waypoints and name each one in order |
| Vehicle or prop faces backward | The starting image has an ambiguous silhouette or conflicts with the text | Correct the source image and describe one unmistakable orientation cue |
| Red line appears in the output | The marked image is being treated as scene content | Provide a clean reference when possible and explicitly classify marks as non-rendered guidance |
| Camera cuts unexpectedly | Too many events are compressed into one clip | Request one unbroken take, remove secondary actions, or split the route |
| Buildings change scale or position | The move spans too much space for one coherent reconstruction | Keep each segment within one spatial zone and use closer landmarks |
| Final action is missing | Earlier beats consume the available duration | Move the ending earlier, remove a waypoint, or generate the ending separately |
This workflow is not deterministic tracking. It narrows the model's choices enough to make generated takes easier to direct and edit.
Frequently Asked Questions
Is Seedance 2.0 Path Control an official spline or motion-path feature?
No official material cited here describes a spline tool. ByteDance documents multimodal references and camera control; the red-line method is a community workflow.[1][2]
Will Seedance follow the drawn path exactly?
Expect broad interpretation, not pixel-level tracking. The model infers depth, altitude, speed, and occlusion from a flat image while also following the prompt.
Does the path have to be red?
No official requirement says it must be red. Use a consistent color that contrasts with the scene.
Should I upload both a clean image and a marked image?
When multiple references are supported, assign appearance to the clean image and movement guidance to the marked copy. With one image, reinforce the cleanup instruction.
Why do brooms, cars, or spaceships sometimes travel backward?
The reference silhouette may be ambiguous. Fix it and add a positive cue such as “the nose points forward” or “the bristles trail behind,” rather than only saying “do not reverse.”
What types of shots are best for this workflow?
It suits FPV flights, drone-like reveals, chases, and fly-throughs anchored to visible geography. It is less suitable for routes outside the image or moves requiring measured precision.
Conclusion
Seedance 2.0 path control works best as a directing aid: the still proposes a route, the prompt translates it into spatial actions, and review determines whether the take works. Keep every turn tied to a landmark and fix orientation in the source image. For precision, build the sequence from shorter controlled clips instead of expecting one line to behave like a 3D camera rig.
References
[1] ByteDance Seed Team, “Seedance 2.0 Official Launch”, February 12, 2026.
[2] ByteDance Seed Team, “Seedance 2.0” model overview, accessed August 5, 2026.
Author

Categories
More Posts

How to Convert a Photo to Video with AI (Free, No Sign-Up Tricks)
Step-by-step guide to turning any photo into a video using AI. Covers image-to-video basics, prompting tips, real use cases, and free tools that actually work in 2026.
Seedance 2.5 Prompt Guide: Examples & Templates
Learn the official Seedance 2.5 prompt formula with examples for 30-second timing, references, editing, extensions, keyframes, blockouts, audio, and camera.
Atlas Cloud vs Higgsfield for Seedance 2.5
Compare Atlas Cloud vs Higgsfield for Seedance 2.5 access, including API versus studio workflow, current model status, hidden costs, and launch-day checks.